Raijin plugin for Apache Superset
Manual setup
Before proceeding, install Raijin by following the installation instructions for your platform.
These instructions were tested with the following software versions:
-
Ubuntu 20.04 LTS
-
Python 3.8.1
-
Raijin 0.9.3961
-
Apache Superset 1.5.1
Installing Apache Superset
The following steps guide you to install Apache Superset from scratch, install the Raijin plugin for Apache Superset, and start a development web server. Refer to the Apache Superset documentation for other installation options.
-
Install the Apache Superset OS dependencies.
$ sudo apt-get install build-essential libssl-dev libffi-dev python3-dev python3-pip libsasl2-dev libldap2-dev -
We recommend installing Apache Superset inside a Python virtual environment. Execute the following commands to create a virtual environment and activate it:
$ sudo apt install python3.8-venv $ python3 -m venv superset-venv $ . superset-venv/bin/activate -
Install Apache Superset and the Python library dependencies. Note that the required library versions vary depending on your installed Apache Superset version.
(superset-venv) $ pip3 install apache-superset==1.5.1 (superset-venv) $ pip3 install SQLAlchemy==1.3.24 (superset-venv) $ pip3 install Flask-WTF==0.14.3 (superset-venv) $ pip3 install itsdangerous==1.1.0 (superset-venv) $ pip3 install flask-caching==1.11.1 (superset-venv) $ pip3 install markupsafe==2.0.1 (superset-venv) $ pip3 install requests (superset-venv) $ pip3 install wheel -
Set the
FLASK_APPenvironment variable.(superset-venv) $ export FLASK_APP=superset -
Initialize the Apache Superset metadata database.
(superset-venv) $ superset db upgradeApache Superset uses SQLite by default but also supports PostgreSQL and MySQL. See Using a production metastore in the Apache Superset documentation for more information.
-
Create an admin user to access the Apache Superset UI (
adminusername is required to load the data examples in the next step)(superset-venv) $ superset fab create-admin -
(Optional) Load the data examples.
(superset-venv) $ superset load_examples
-
Create the default roles and permissions.
(superset-venv) $ superset init -
Download the
superset_raijin_plugin.tar.gzpackage from the Downloads page. -
Install the Raijin plugin for Apache Superset.
(superset-venv) $ pip3 install superset_raijin_plugin.tar.gz -
Start an Apache Superset development web server.
(superset-venv) $ superset run -p 8088 --with-threads --reload --debuggerThe development web server is not intended for production use. See Running on a WSGI HTTP Server in the Apache Superset documentation for more information on configuring a production web server.
-
Open the Apache Superset UI by accessing
http://localhost:8088in your browser.
Configuring a Raijin data source
-
Open the Apache Superset UI and navigate to Data > Databases.
-
Click the + DATABASE button.
-
Select Other from the SUPPORTED DATABASES drop-down.
-
Enter a DISPLAY NAME, e.g.,
raijin. -
Enter the SQLALCHEMY URI to connect to the Raijin Database server in the format
raijin+http://root:root@<raijin_ip>:<raijin_port>/.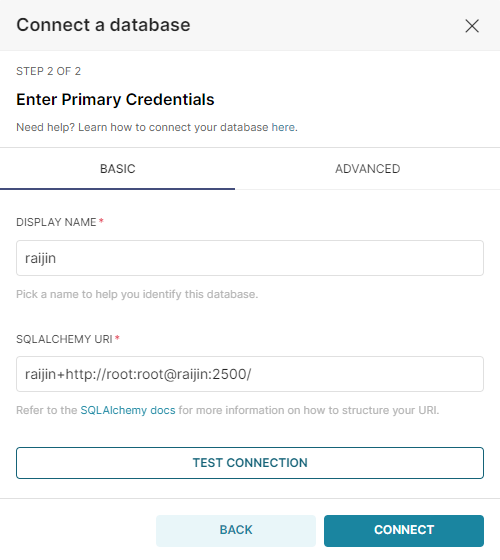
-
Click the TEST CONNECTION button to verify that the connection is successful.
-
Click the CONNECT button to save the connection.
-
Navigate to Data > Datasets.
-
Click the + DATASET button.
-
Select the database connection you created above in the DATABASE field.
-
Select the database and table for the SCHEMA and SEE TABLE SCHEMA fields respectively.
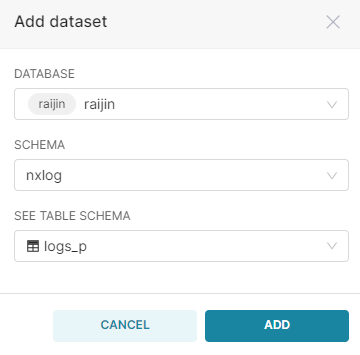
-
Click the ADD button.
Visualizing data
Once you have created the Raijin database connection and added the datasets, you can create charts and dashboards to visualize your data.
-
Navigate to the Charts page and click the + CHART button.
-
Choose your dataset and select a chart type. In the screenshot below, we chose Table.
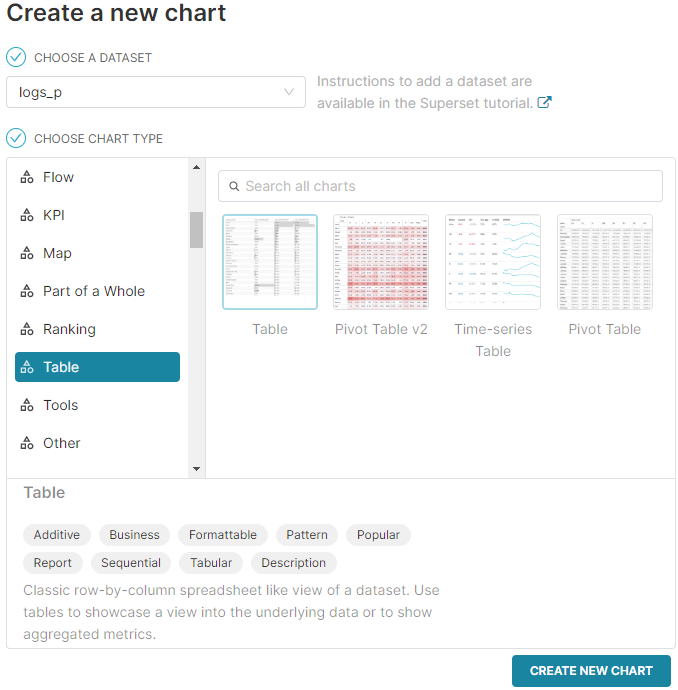
-
Click the CREATE NEW CHART button.
-
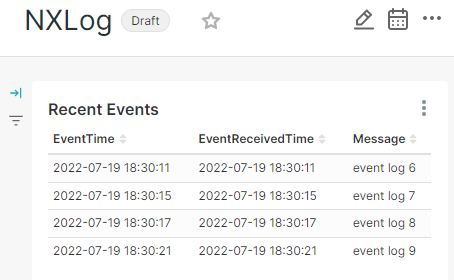
Continue to configure the chart settings and click RUN to test your settings. In the screenshot below, we have configured the table to show raw records.
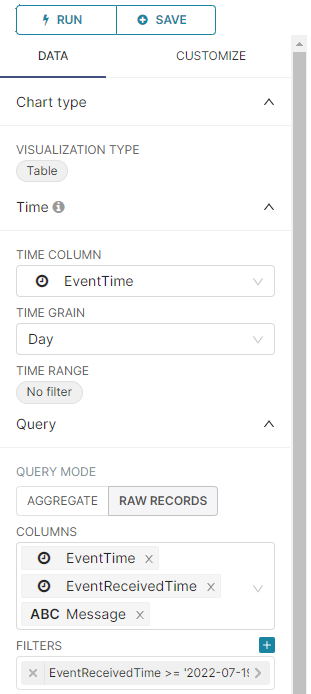
-
When you finish configuring your chart, click the SAVE button, enter a chart name and dashboard, and click SAVE & GO TO DASHBOARD.
Container-based setup
The raijindb/raijin-superset container on our Docker Hub page makes it easy to deploy Raijin and Apache Superset as a Docker application stack.
These instructions require Docker Compose and Docker Engine. They have been tested with Docker Desktop 4.10.1 (82475) and Docker Engine 20.10.17.
-
Download the Raijin Apache Superset container package from the Downloads page. This package configures Apache Superset with a PostgreSQL metadata backend, Gunicorn web server, and Redis message queue.
-
Extract the contents of the archive.
$ tar -xf raijin-superset-container.tar.gz -
Start the container-based setup from the directory where
docker-compose.ymlis located.$ docker-compose up -dSetup may take ~2-5 minutes to complete depending on your CPU.
-
Create a DNS entry for the Raijin website or add the following line to your
/etc/hostsfile on Linux orC:\Windows\System32\drivers\etc\hostson Windows for testing purposes:127.0.0.1 localhost raijin -
After the container starts, you can access the following URLs:
-
http://raijin:2500for the Raijin UI -
http://localhost:8088for the Apache Superset UI
-
See the README.md file included in the package for more information on the setup.